Coding on an iPad with ProxMox
Secure, remote access to VSCode from a Tablet (or anywhere)
Note: The vast majority of this article is a repeat of steps outlined in this doc from Tailscale. I’ve taken the liberty to expand a bit on the original instructions to add some additional features not covered in Tailscale’s KB, such as Caddy installation and how to enable Copilot on the remote server
With seldom recent access to my home computer, it can be difficult to get quick access to an environment where I can reliably do development tasks. My laptop is aged and barely functional, but I do have an iPad that is in slightly better shape..it’s an older generation so doesn’t support all of the latest niceties, but it reliably run workloads on the web. Of course, the issue is that you can’t develop software on a (Gen 6) iPad.
This got me thinking on if there are any novel solutions that would enable me to manage some lightweight development tasks on my iPad.
As it turns out, my ProxMox setup might provide a novel solution to this issue.
I’ll skip the ProxMox setup, but some specs for the VM:
- Memory: 4.00 GiB
- Processors: 2 (1 sockets, 2 cores)
There are plenty of ways to set up Ubuntu in ProxMox: the VE Helper Scripts site is a great resource for quickstarts.
Disclaimer: Always make sure you read and understand scripts from the internet before running them.
Outline
The goal here is fairly straightforward: set up a workstation VM on ProxMox, and enable access to it from an iPad.
The following would be ideal:
- A graphical text editor, such as VSCode
- SSH and terminal access (which we access via Terminus)
You could go the whole nine yards and just create a VM with remote access via noVNC, noMachine, or some similar remote desktop suite, but given resource contraints we can strive to keep things lightweight.
1) Securing Remote Access with Tailscale
Use whatever VPN solution you prefer, but I’ll give a node to Tailscale for its ease of setup, out-of-the-box features such as automatic SSL provisioning and a host of supported [authentication providers]. Note that my previous article on Tailscale setup via pfSense directly is no longer my preferred route - I find that it is easiest to simply put it whichever LXCs/VMs require it, and keep it off of my PVE host directly.
In this case, I do have a subnet router and existing node that is an entry point to my local subnet with my virutal cluster, but for code-server to work we’re going to need SSL support for all features to work - it’s not easy to do this through a bastion/entrypoint, so to make things easy we’ll put it direclty on the node.
I’ve skipped walkthrough of the step explaining setup of the Ubuntu VM and setting up SSH access, but by this time I have already:
- Set up and enabled SSH access
- Added my publickey to allowed hosts for this VM
- Set up my Tailnet and account on Tailscale
Once in the Ubuntu VM:
1
curl -fsSL https://tailscale.com/install.sh | sh
Follow the authentication steps to get the device joined to your Tailnet.
I should add that by this point, I’ve also joined my iPad to my Tailnet via the iOS app.
Once connected, we’ll get the service up and runnning:
1
2
sudo tailscale up
sudo systemctl enable tailscaled
2) Installing Code-Server
While VSCode has native, existing support for remote access, it is less extensible for this use case than code-server. code-serveris a tool that allows you to run VSCode on a remote server and enable access from a browser.
The intial installation and setup of code-server is straightforward:
1
curl -fsSL https://code-server.dev/install.sh | sh
You’ll be walked through some interactive setup steps. Once complete, go ahead and start code-server:
1
sudo systemctl enable --now code-server@$USER
Once the server is up and running, we’ll need to make some configuration changes to config.yaml
1
vim ~/.config/code-server/config.yaml
1
2
3
4
# ~/.config/code-server/config.yaml
bind-addr: <your-ip>:8080
auth: none
cert: false
As per the Tailscale article, make the following updates. You can find the Tailnet IP of the VM in your admin dashboard

Once we alter and save the config file, go ahead and give the service a restart:
1
sudo systemctl restart code-server@$USER
The server can now be visited in your iPad’s browser at your VM’s IP address on port 8080.
3) Installing and setting up Caddy
Installing Caddy
Caddy is a web server that will be used as a reverse proxy for our Tailscale traffic
A reverse proxy is a server that sits in front of web servers and forwards client (e.g. web browser) requests to those web servers. Reverse proxies are typically implemented to help increase security, performance, and reliability.
Full instructions can be found here, but to install Caddy:
1
2
3
4
5
6
7
sudo apt install -y debian-keyring debian-archive-keyring apt-transport-https curl
curl -1sLf 'https://dl.cloudsmith.io/public/caddy/stable/gpg.key' | sudo gpg --dearmor -o /usr/share/keyrings/caddy-stable-archive-keyring.gpg
curl -1sLf 'https://dl.cloudsmith.io/public/caddy/stable/debian.deb.txt' | sudo tee /etc/apt/sources.list.d/caddy-stable.list
sudo chmod o+r /usr/share/keyrings/caddy-stable-archive-keyring.gpg
sudo chmod o+r /etc/apt/sources.list.d/caddy-stable.list
sudo apt update
sudo apt install caddy
Enable HTTPS in Tailscale
From their docs:
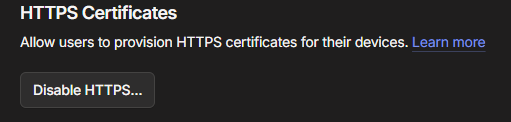
To be able to provision TLS certificates for devices in your tailnet, you need to:
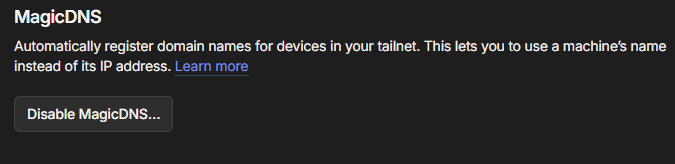
1) Open the DNS page of the admin console.
2) Enable MagicDNS if not already enabled for your tailnet:
3) Under HTTPS Certificates, select Enable HTTPS:
4) Acknowledge that your machine names and your tailnet DNS name will be published on a public ledger.
5) For each machine you are provisioning with a TLS certificate, runtailscale certon the machine to obtain a certificate.
Configure Caddy for SSL Termination
Configuration changes in Caddy are managed via a Caddyfile. We will update this file to make the required configuration changes to proxy requests to the running code-server:
1
sudo vim /etc/caddy/Caddyfile
We’ll enter the same IP from the earlier steps, and enter the hostname of the Ubuntu VM as it corresponds in the admin console of Tailscale:
1
2
3
ubuntu.<your_tailnet_name>.ts.net {
    reverse_proxy <your_ip>:8080
}
Enable the caddy user to get Tailscale certificates
By default, Caddy install scripts run the server under the caddy user. For this to work with the Tailscale certificates, we must edit the configuratation file for tailscaled, the background service for Tailscale:
1
sudo vim /etc/default/tailscaled
We’ll add an extra flag to this config file:
1
TS_PERMIT_CERT_UID=caddy
Reload both caddy and tailscaled
1
2
sudo systemctl reload tailscaled
sudo systemctl reload caddy
Generate Certificates
1
sudo tailscale cert <your_vm_hostname>ts.net
4) Confirm Changes
To confirm changes, you can now visit https://machine-name.domain-alias.ts.net in a browser. You should see that VSCode is now being served in your browser:
This completes the initial setup as outlined in the Tailscale docs.
There is one quality of life improvement for those that use GitHub Copilot chat features.
5) [Optional]: Enable GitHub Copilot
Note: This is a workaround fix and, at present may be a little buggy
By default, code-server does not use the default VSCode extension marketplace. As such, installations will not work with Copilot chat. We’ll have to add the extension manually.
By this point, I’ll also assume that you’ve taken proper steps to enable git locally on the VM as well as signing in to code-server with your GitHub account (if you want settings sync).
The TL;DR of working around this issue is found in this GitHub issue
It involves adding the VSCode extension marketplace URL to the environment of the code-server application so that the application can find and install Copilot and Copilot chat.
Option 1: One-time install from shell
In a terminal session on the Ubuntu host:
1
2
3
export EXTENSIONS_GALLERY='{"serviceUrl": "https://marketplace.visualstudio.com/_apis/public/gallery", "itemUrl": "https://marketplace.visualstudio.com/items"}'
/tmp/code-server/bin/code-server --install-extension github.copilot
/tmp/code-server/bin/code-server --install-extension github.copilot-chatexport
This should install the Copilot chat on the host.
While this worked for my installation, it is also noted that for installations running as a background process, you’ll need to actually edit the environment variable in the process manager:
Option 2: Edit the Service File (Recommended)
This option will permanently add the VSCode extension marketplace to code-server and anecdotally resolved the subsequent sign-in issues I was having.
1
2
[Service]
Environment=EXTENSIONS_GALLERY='{"serviceUrl":"https://marketplace.visualstudio.com/_apis/public/gallery","itemUrl":"https://marketplace.visualstudio.com/items"}'
In my case, the config file is located: /lib/systemd/system/code-server@.service
Then reload and restart:
1
2
sudo systemctl daemon-reload
sudo systemctl restart code-server-yourname
On restart, this should show the Copilot extension available for install, as well as any other extensions that may not be included with the default marketplace.
Conclusion
While perhaps not an ideal workstation, a remote server to host an IDE does enable virtually all facets of development to be performed from an iPad. Tailscale adds an easy, nice layer of personal security at minimum network configuration overhead. code-server is surprisingly feature-complete for being fully-browser based and retains most all of the features you’d see on something like vscode.dev. The added bonus is offloading the heavy lifting of processing to your virtual machine, leaving my relatively underpowered iPad free to handle just the the editing tasks in the IDE.