React Router is a useful client-side routing library that enables developers to dynamically render mutliple components on a single HTML document Here is some bold text
Before reading this article, if you are unfamiliar with React or React Router, you can find their documentation here and here. I’ll also be providing some examples of how to use React Router with code examples from my recent bootcamp project at Flatiron.
If you’ve used React before, you’re well aware of its convenience and efficiency when it comes to creating single-page applications. Oftentimes, however, we may want our sites to contain multiple ‘pages’ through which users can navigate their different interfaces. This is where React Router comes in!
Client-Side vs. Server-Side Routing
Traditionally, websites we encounter are server-side rendered — that is, every time we change the URL of a website (for example, navigating from /home to /about on a webpage), a full GET request must be sent to retrieve an entirely new page on the backend. While this has uses for its efficiency with only utilizing requested data, there are often drawbacks that make server-side routing a bit unsavory to implement for small-scale web applications. For this purpose, client-side routing may prove a more hassle-free, efficient means of website navigation. Client-side routing fetches an entire webpage upon the initial URL request, and from there all routes within the webpage are handled internally by the JavaScript that loads with the page. While this may make load times longer for larger projects, it also ensures that repeated navigation throughout the site does not trigger a refresh, markedly cutting down on subsequent load times. Furthermore, reused components of a website, such as a header and a footer, remain rendered throughout the entire visit.
React Router in Practice
To get a better sense of how react-router works, let’s take a look at my frontend project, Jobase:
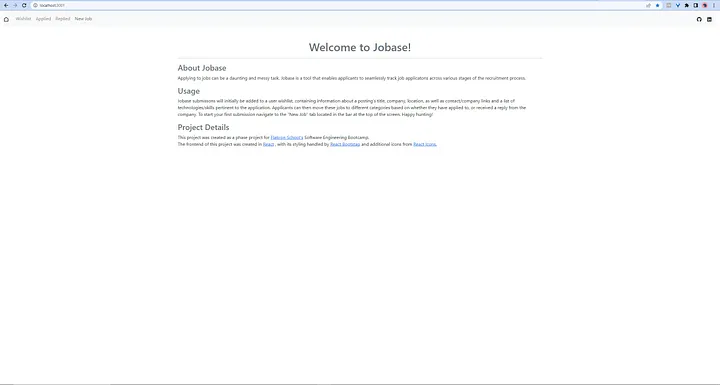
Taking a closer look, we notice that the navigation bar contains a series of navigation links around the site:

The home button, Wishlist, Applied, and Replied tabs all correspond to the ‘pages’ of this application, whose rendering React Router takes care of.
React router cleverly takes advantage of a few built-in JavaScript features, chiefly:
window.location
This method returns an object from which we can reference the path value of a URL location, such as /home. While
window.location.pathname
Can be used to programmatically render React components via conditional logic, the result is JavaScript which is a bit terse. Rather, react-router applies React’s declarative approach to pass the URL path as a component prop, with the library handling the conditional logic. In my project, this makes the rendering of my above conditional components much more logical (I cut out some of my prop passing for ease of reading):
<Switch>
<Route exact path='/'>
  <Home />
</Route>
</Switch>
<Switch>
<Route exact path='/wishlist'>
  <Wishlist/>
</Route>
</Switch>
<Switch>
<Route exact path='/applied'>
  <Applied/>
</Route>
</Switch>
<Switch>\
<Route exact path='/replied'>
  <Replied/>
</Route>
</Switch>
Here, the Switch statements match the URL route and render the first match (the exact keyword denotes that the path must match exactly as passed into the route). Now, if I type the URL address of my site suffixed with /wishlist, react-router will render the Wishlist component of my application:

We can take this one step further by adding support for clicking the navbar links at the top of the page for their respective pages. In doing so, react-router will utilize another feature of JavaScript’s Window API:
window.history
The history method allows us to access the cached URLs that we have obtained from a browsing session on a website. This, in turn, allows us further to manipulate the browser URL using JavaScript with the
window.history.pushState(state, title, url);
Function. When used, this function will not trigger a refresh. Now, with some <a tag formatting, we can use base React to change the URL upon the click of a link — this again, however, results in code that is less than elegant. Rather, react-router bundles all of this functionality into a cleaner component, Link. In my code, I used a version of the react-router NavLink component bundled into react-router-bootstrap, called LinkContainer — its behavior is functionally the same:
<LinkContainer to='/wishlist'>
  <Nav.Link>Wishlist</Nav.Link>
</LinkContainer><LinkContainer to='/applied'>
  <Nav.Link href="applied">Applied</Nav.Link>
</LinkContainer><LinkContainer to='/replied'>
  <Nav.Link href="replied">Replied</Nav.Link>
</LinkContainer>
Here, LinkContainer is what handles the URL routing, and Nav.Link is simply a bootstrap styling component. These work together with the aforementioned Switch and Route components to conditionally display the ‘pages’ of my application whenever a navigation link is clicked — the link changes the URL, and the react-router components handle this URL change by displaying the component that corresponds to that route’s URL. No GET requests are needed! In turn, this feature allows for a simple yet effective implementation of multiple pages within a React single-page application!